By Paul Carracino
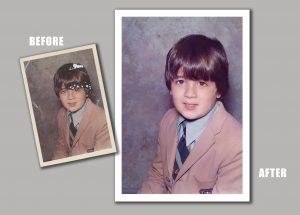
Almost everyone over the age of 30 has one, a large box in the attic or basement stuffed with old printed photos. Sadly, those old printed photos don’t last forever. Many cherished prints may be scratched, torn, dog-eared, and faded from years of enjoyment. If this sounds familiar, don’t worry, there’s hope.
For this blog article, I’m not going to go into the fine details of image restoration. Instead I want to just touch on the basic steps to follow that will allow you, the user, to drill down into each step until you are comfortable editing images on your own.
Generally speaking, there are a few basic steps required to restore old photographs that apply to most of them.
First step; you need to digitize the old paper photos so your computer can understand them. This process can be done using a regular desktop scanner. If you don’t have a scanner, you can take a picture of the image with a digital camera. If you don’t have a scanner or a camera, you still have hope. Today, thanks to modern, powerful smart phones, you can use a scanner app which has lots of special tools to help you get the best possible shot of your photograph to work with.
Second step; once you get a good digitized copy, you will need to open the image in Adobe Photoshop or any one of today’s advanced photo editing programs. For example, I will use Photoshop, but most image editing programs work much the same way. Always keep the original image as a reference. This is important because it allows you to have something to compare any edits you do to your final image. Photoshop allows you to create a second layer within the single file which lets you toggle between edited and original image, this technique helps when editing to see which changes improve the original and which changes don’t.
Third step; It is best to straighten the image before doing anything else. You will use the CROP tool to do that. This tool will allow you to select the image and rotate to it to square. At the same time, you can also crop the raw image to trim off any unwanted areas using the same CROP tool. This step is very straight forward and simple, but great care should be taken when deciding how an image will be cropped to get the best possible effect.
Fourth step; you will use the CLONE tool. With this tool, you can retouch spots and scratches found on most old images. Sometimes large sections of the image are damaged or torn, these can be tricky but with some practice on the CLONE tool, anything is possible. The DUST AND SCRATCHES filter is also very useful for overall image noise and small scratches. The SPOT HEALING tool is very good to help remove the occasional spot or image defect.
The final step is to color correct the final composed image. The COLOR BALANCE and HUE AND SATURATION tools are good for overall color adjustments. If you want to fine tune small areas within the image, you will need to create selection areas and apply edits using the CURVES tool. This step has many, many nuances. Entire books have been written describing methods for proper color correction, so it’s really up to you how far you want to go. You can find a myriad of YouTube videos that go into greater detail than I described in this blog.
Once you get the image to where it looks the way you want, don’t forget to save the final image in your preferred file format. Most digital photographs today are saved as .jpg or jpegs.
Congratulations, you just edited your first photo.